Monday 19 December 2011
0901877 Just A Note To Marker
NOTE: We have all made an equivalent contribution to the group blog, however to see what each group member has completed individually, I have asked for all posts to begin with the students SID number. This is intended to help work out who has posted what.
Saturday 17 December 2011
0907803 Slice Tool, The Old to The New


0907803 Buildings

0907803 Sinks and Tapes


0907803 Toilet

The toilet was tricky. I created the bowl by using a box with plenty of vertices so I could manipulate them as I wanted. First I shaped the outside of the bowl by selecting the middle row of vertices and, with the soft select on, pulled them closer together. This created the nice curve that makes the bowl slop like an hourglass. The inside of the bowl was created using a similar method. I simply selected the middle vertices on the top of the bowl and, with soft select on. I dragged it down, making sure that the overflow from the soft select left and even rim around the top of the bowl. The back is simply made of a rectangle with a chamfer applied to the top of it, then it simple rest on top of another rectangle that links it to the base.

I then attached all of these together in order to create one object and then applied the symmetry tool to create the hole toilet, I needed to do this know so I could work out how big the seat needed to be.

The seat was created the same way as the arc gravestones however with more vertices. Also as the seat needed depth, after I used the soft select tool to move the vertices into an arc, I applied the extrude tool. However as the soft select made the back of the seat curve slightly as well, rather then retry to so it with a flat edge, I simply attached a thin box to the back of the seat.

This is the seat with the symmetry modifier applied to the rest of the toilet. I kept the seat a separate object so we could move the hinge should we which to animate it opening and closing.

The handle was simply created out of three cylinders of different sizes attached together, and then the gyro moved off that it would rotate around the section attached to the toilet. Again I kept this a separate object so it would be easier to apply a different texture and so we could animate it moving if we wished.


This is the toilet with the texture applied and a turbo smooth applied to the seat. All in all I am quite proud of this as it looks quite realistic despite its relative simplicity.
Friday 16 December 2011
0907803 - Creating the roof


0907803 - Gravestones

There were two types of gravestones I created for the Graveyard next to the guildhall. They were both the traditional gravestones of a Cross and an arched plaque. The cross is made from two simply planes with only 1 face on each. As you can guess I simply crossed the smaller one over the larger at an appropriate height then attached them together and applied a stone texture with a bump. The second grave stone was created out of one single plane with 5 vertices along its length. Then using the soft select tool I moved the middle two vertices up, this arced the others into a nice curve. Then I simply added the same stone texture as before and it was done. As I knew that both of these where going to be replicated several times each I kept them both flat, rather than extruding them in order to keep the overall number of polygons as far down as I could.

0907803 Trees

The trees in the scene are simply created with the foliage tool in 3D MAX. They just needed there leafs and fruits removed in order to fit with the winter theme. This was actually quite lucky as the extra faces and polygons the leaf’s created was a grate drain on the computers to render them.

0907803 Road and paths
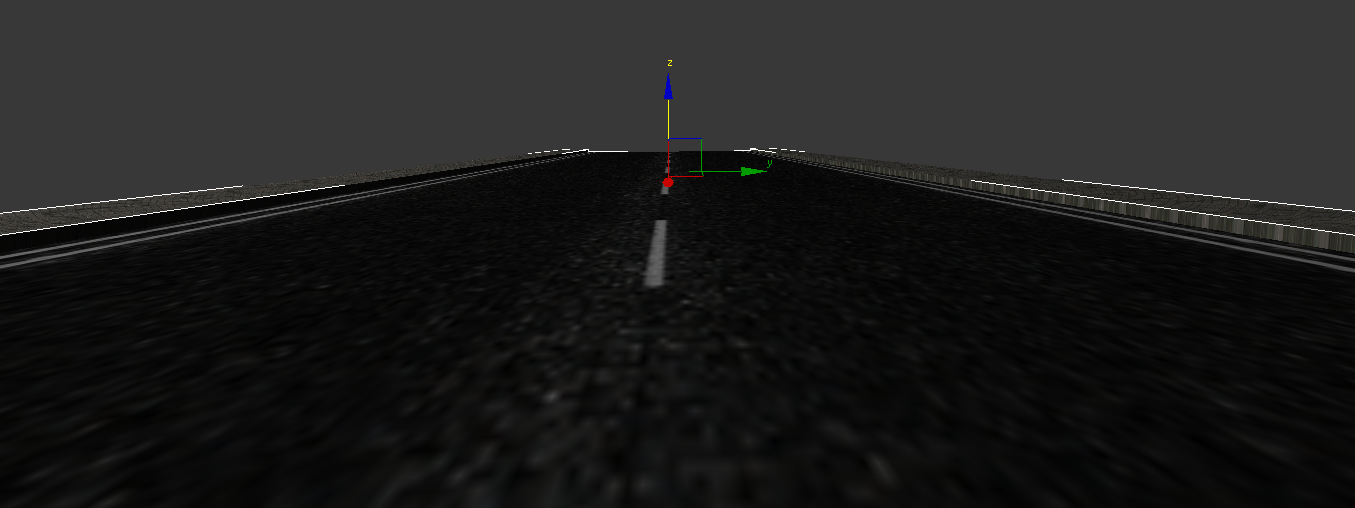
The road and the paths where created again using planes and textures with bump applied. The only real difference between these two and the other planes the scene is that there textures had to be heavily modified in Photoshop before they could be applied. The road texture was especially difficulty as it was not tiled needed the lines added to it in order to make it work. I also extruded them and turned them into 3d boxes. This was mainly important for the paths as they needed to be higher up then the road on account of the sidewalk.

0907803 - Grass

The grass is simply a plane that I created with 10 vertices in both width and length. Then with the soft select tool applied I moved these vertices up and down to create a slight bumpy and hilly ground. Then it simply had a grass texture applied along with the bump tool to give it the look of a grassy plane. Much like with the sky, when the snow starts to fall, the texture of the grass needed to change to match the scene. This was achieved my creating a duplicate of the plane slightly on top of the original. This new plane was given a snowed on grass texture and then hidden from view completely with the slice tool. Then when the timing was right the slice tool was pulled down and the plane was reviled much like the sky. This created a nice and smooth looking transition between the two planes.

0907803 - Settleing the snow

It took a while to figure out how to stop the snow (which 0901877 created) from falling through the guildhall and instead settle on the roof. I eventually discovered the Deflector tool. When this tool was linked to the snow generator, the particles reflected of it. In order to make them settle on top of it I had to reduce the bounce values in the deflector to zero and then also apply a gravity tool to the snow itself, so the particles would be pulled to the deflector. This however made all the snow in the scene drift one way so I had to create a replica of the snow generator and remove the gravity affects. This made the snow much more natural. Then I had it follow the outside camera so that it was always covered in snow. However because the camera was so close to the snow fall, and the way the snow tumbled, they occasionally drifted into shadow and became pitch black. So in order to stop this I created another omi light behind the camera and made it so it only affected the snow particle. This removed the back shadow effects on them quite effectively.


0907803- Creating the sky

The sky was created simply my using a large sphere with the faces reversed. Then a cloudy texture was applied and an omi light was added in order to give off light inside the sphere. A slightly larger sphere was also created and again had its faces flipped so the texture was on the inside. Then a much more clouded texture was applied to it and it enveloped the original sphere. Then using the slice tool I was able to create a transition between the two for when the snow stared to fall.

Wednesday 7 December 2011
0907440 - Camera Path Plan (First Floor)
This is the continuation of the internal camera path sketches. The camera comes up the stairs from where it left off in the previous sketch (but will be made as a single animation), into the reception hall. After a look around here it will show where the new toilets will be placed, before returning back the way it came and moving past the chimney breast it will move into the Guildhall. It will look around here then move into the kitchen. Moving back out of the kitchen a possible finish would be stop so the camera is looking out of one of the first floor windows.


0907440 - Camera Path Plan (Ground Floor)
The following is a little sketch that I have made to show a plan for how the camera will move through the ground floor of the building. This does not include any path the camera will follow outside the Guildhall, and a second sketch will be produced for the first floor. The camera starts in position:
X: -639.258
Y: 175.931
Z: 48.359
It rotates around the shop then moves into the first museum room, angled to get a look at the map, and then will move into the larger of the museum rooms, getting a good look at the contents. It will leave the museum via the glazed walkway, and enter the library. After a look around here the camera will leave the room, coming back into the glazed walkway area and will proceed to the stairs.

Sunday 27 November 2011
0907440 - Book for the Shop
Here is one of the book that I have made for the Guildhall shop. 101 Dalmatians by Dodie Smith, who made her home in Finchingfield and whose works are intended to be stocked at the Guildhall.
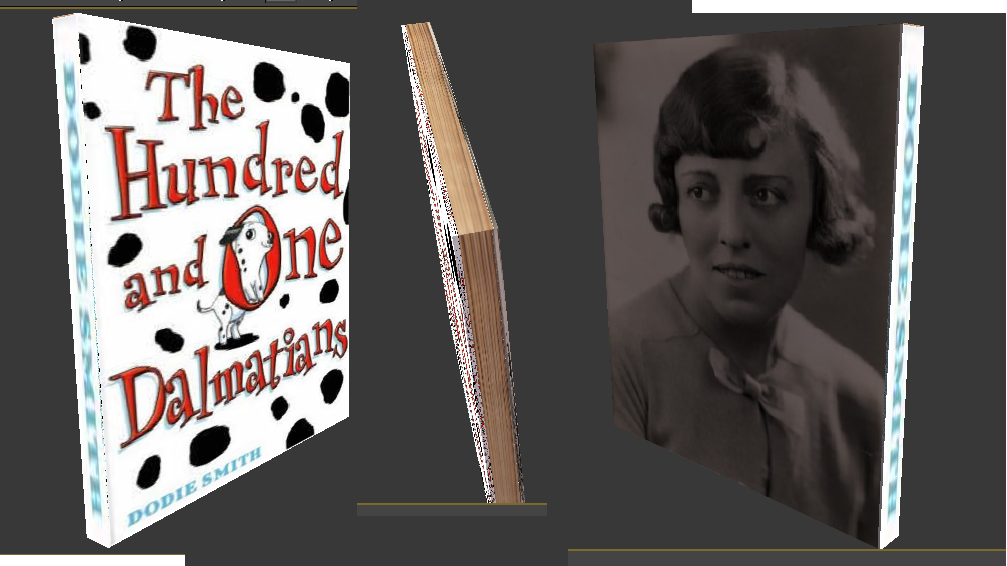 |
| Three views of the book. |
Thursday 24 November 2011
0907440 - Working on the Rafters
Although another group member has made the roof as it will be seen from the outside, as a part of my building the bulk of the building itself I have been working on the rafters. The rafters are not a complex model, simply made with Box Standard Primitives, although there is a lot of work and detail involved in order to get the Guildhall's system of beams into an accurate representation. It is currently still a work in progress that will be finished once the roof itself is imported into the scene. Additionally there are still some beams that need to be added throughout the Guildhall along the walls.
Adjustments to the placements of various beams need to be made as the framework becomes more complex.
 |
| Pre-Rafters Render |
 |
| Working on the Rafters in Max |
 |
| Adding Rafters and Making Adjustments |
0901877 - Script To Go With Storyboards
Hello everyone and welcome to the Finchingfield Guildhall short renovation clip. We hope to demonstrate to you how the renovations have been implemented and how the Guildhall will now be used in order to entertain and educate people young and old on the only secular building available to the public.
Over many seasons, the building work has finally been completed, so let’s take a look inside!
Here we have the entrance to the guildhall and the shop. Firstly, you can see that we have easily accessible toilets which have been positioned near the entrance/exit for practicality. Right, into the shop. The shop is used by the whole community, including school children not just from the local areas but from other boroughs as well. We have stocked lots of inexpensive merchandise such as pencils, rubbers and notepads with the Guildhall logo on them to remind the purchasers of their visit to this historic building. The shop also stocks pieces of work from famous novelists such as Dodie Smith, the mastermind behind “101 Dalmatians” and Norman Lewis who wrote “Naples 44”. A watercolour collection by Arthur Legge will also be available in the shop too.
Now we are moving from the shop to the Museum area. Arthur Legge’s daughter, Phyllis, designed a map of Finchingfield and the original was given to the Guildhall. This has been printed on the modern lino which covers the floor in the temporary exhibition area of the Museum. This area joins the shop to the Museum and the space will be used in the future so that local groups and societies can give educational talks and displays to the public.
In the main museum area, the various items will be displayed in a series of glass tables with interactive touch-screen technology. This will promote learning by displaying the objects in their best possible light and help explain the history behind this ancient building. The technology used in the glass tables is inspired by the Darwin Centre in the Natural History Museum and the aim of using this technology is to make it easier to change the content of the displays more frequently, therefore making the museum a fun, family-friendly, interesting place to visit and learn from. There are also speakers situated throughout the museum area which will play recordings about the history of Finchingfield, particularly about what the village used to be like when there was a more agricultural-based economy. This would be interesting for the older generation so they can reminisce on the “good old days” and for the younger generation to gain an idea on what life was like before they were even thought of!
Moving on to the library, there is a massive stock containing a variety of different books which will interest anyone who visits. The idea is to create a cosy room, with fireplaces to give a warm and welcoming atmosphere and sofas in order to encourage parents and children to read together in a quiet environment. Also in the library, there is a photocopier as there is not one available locally and it has been requested and greatly welcomed by the village occupants and computers with fast broadband access.
That’s it for the ground floor, moving up onto the first floor.
Here we have more toilets and baby changing facilities to meet the needs of visitors.
Now, in the guild room, it has been restored to the original Guildhall layout and it can be utilised in many different ways and for various different uses. When the building was new, around 1470AD, it was used by the Guild of the Holy Trinity for religious purposes and as a school. The idea is to continue using this building in a multitude of different ways so that it can not only meet the needs of the Finchingfield community, but also the needs of other boroughs and nearby villages as well so they too can benefit from this unique building and its histories.
Right, time for the kitchen. The kitchen is where all meals and drinks are carefully prepared for consumption by the visitors of the Guildhall. Prices are very reasonable and money will be used to help improve the Guildhall even further.
Well that’s the new Guildhall! We hope you enjoyed our renovation clip!
Wednesday 23 November 2011
0901877 - Storyboards to Demonstrate Animation
These are the storyboards which the group will follow in order to animate the Guildhall.

 Firstly, the clip starts showing the "old" Guildhall building before it has been renovated. It will be shown in the Summer so it makes it easier for the person looking at the video to see the detail in the exterior. There will be sounds in the background to indicate that it is Summer, for example birds singing.
Depending on the amount of time we will have, the original idea was to have a clock appear in the middle of the screen showing the seasons. The background scenery will change from Summer to Autumn (Orange sky, orange/brown trees and leaves on the floor) and then to Winter, where a slice modifier will be applied and the new building will be revealed. The reason why we felt that the season changing was important was because not only does it symbolise that the renovation works are being taken place, but it also gives us an excuse to show off other animation techniques. For example, we have created fireplaces with working flames and smoke. However, these will not be lit during the Summer periods. Also, we felt that the Guildhall could be used more in the Winter months as it is a warm place for the community to visit and explore. We are hoping to create a snow effect too and the lights will be illuminated inside the building to give a welcoming feeling.
A silhouette will be walking down the path and as it approches the doorway, the camera pans round to focus on it. The video will be based on a human eye's account of the renovations that have taken place.
The next couple of drawings show the silhouette's movement throughout the building. It may or may not be used in the final clip. It really depends on the effect that we are tryiong to create. As a minimum, it is a guide to us as developers to plan where the path will be set for the silhouette.
4a through to 4h shows how each of the components can be animated in order to show how the Guildhall works and how the public will be able to interact with it. Due to time contstraints, we may only be able to use the same silhouette feature. In an ideal world, we would have created individual people models and used them instead to show off some of our other techniques. However, our main focus is getting the building itself finished on time.
At the end of the tour, the silhouette will approack the exit and a "Fade To Black" screen transition will be applied. Scrolling credits will complete the clip, along with our group SID numbers and thanks to the Guildhall society for letting us tour the building and gain valuable firsthand experiences. There will be a voice over throughout to explain what each part of the Guildhall does and how it will be utilised.
We aim to use Windows Movie Maker to add transitions and add the voice over. The voice over may have to be edited using software such as Audacity to ensure that it fits in with the clip. The aim is to get the clip to last no longer than 5 minutes because it will simply take too long to finish rendering.
Script will follow shortly...
Monday 21 November 2011
0901877 - Sketches of components to be used in the Guildhall

0901877 Group Meeting 5 Agenda and Report
Meeting on: 25/11/2011 in Room 303C
Expected Attendees:
0901877
0907803
0907440
Agenda:
In the previous group meeting, we decided that it would be appropriate to reduce the number of group meetings in order to create focus on the actual project. If any group members have had any issues, then they have been relayed back to the team leader who has sorted them out accordingly. However, at the end of this week (Week 9) a group meeting has been arranged to discuss the following:
- How well the work is going so far.
- How much work is left to be done on the models so that we can begin the animation process.
- Do we need to make any adaptations to the Gantt chart created at the beginning of the project?
If any members have any issues, please do not hesitate to contact me.
Thanks.
Meeting on: 25/11/2011 in Room 303C
Attendees:
0901877
0907803
0907440
During the meeting, we agreed that although we will meet our target deadline, the other component to the module would suffer as a result so we all agreed that an extension would be the most appropriate course of action, seeing as this is our final year and every mark counts.
UPDATED: 02/12/2011
We have made adaptations to the Gantt chart and instead of having group meetings, we will meet up whenever we need help with aspects of the Guildhall and to put the whole project together. The image below shows the new Gantt chart which will be followed:

Subscribe to:
Posts (Atom)